Thursday, January 13, 2011

Winter Accessory Storage

I came up with a super cool plan for organizing all the kids' winter stuff - hats, gloves, scarves, etc. I color-coded clothes pins for each child by modge-podging scrapbook paper on the outside of each pin. Then, these pins (six per child) were threaded on to jute.

I tied a knot in the jute above, threaded the pin on through the spring, and then tied a knot immediately below the spring.
This was done three times on each side.


Then, I folded the jute in half, and tied a knot about two inches from the top. I hung these strings from 3M hooks.

Now, each child has a string to clip their winter stuff on. This works well because the things are out in the open, so when they come in from the snow (or rain more often here) they can dry out. So many storage systems are enclosed and stuff just stays wet. I really like the way this one works. And, even Hyrum (3 years old) can operate the clothes pins without assistance. The less I have to do, the better. These strings of stuff are found at the bottom of the stairs, adjacent to where coats and backpacks are stored.

Monday, November 8, 2010

Bathroom drawers

Okay, I know it seems like a really long time since I posted last, but that is not because I haven't been organizing. I just, haven't been organizing much. I have been working on the little bits and pieces. I keep hoping that I will get something dramatic done, and then it will be blog-worthy. That fantasy is over. I will never really feel like I have done something blog-worthy. So, I am going to give you some of the bits and pieces as I go along.

Do you remember how excited I was about those silly boxes? You know, the origami ones made out of scrapbook paper? Okay, I will help you out. The first appeared here. Well, I have been putting them to good use. The next place I tried them was in my bathroom. I had drawers that were just collecting stuff, and the stuff seemed to be breeding and making more stuff. I could never really find what I wanted when I wanted it. Solution? Boxes! I went from this:

To this:

From this:
To this:
Best part? I can use whatever colors I want! I can find my stuff! I can fit more stuff in! No, that isn't it, I mean, I can find the stuff that is in there. Yeah for paper boxes! Oh yeah, and I can put matching lids with labels on them if I don't what the husband/kids getting in them so easy.

Posted by Picasa

Thursday, September 30, 2010

Garage

For the past few months I have been stumbling (literally) around my garage knowing it needed some serious work; knowing that my life would be SO much easier if I just cleaned and organized it. However, I have always found other things that were far more pressing - dinner, kids, a movie, painting my toenails... Today, that all ended. It was today or never, and I was really leaning on the side of never. However, I can no longer get to my sewing machine, so I decided to buckle down and get to work. You think I exaggerate on the amount of work that needed to be done? No, sister. It was bad -

Okay, to be totally truthful, the backbone of the work was done months ago by my sweet husband, but there was still work to be done. As we all know, if you don't finish a job completely, it will only continue to pile up. And pile it did. However, after a few hours of work, this is what I ended up with.

Those sheets in the back are just that - sheets. We have the garage divided in two, the front section serving as a storage/garage space, the back section serving as an inclement-weather playroom. Okay, it is really an any-weather playroom. We have no toys in the house, they all live in the playroom. Another of John's amazingly brilliant ideas. And, the sheets are the visual barrier between the two areas. I guess I can only claim half-garage clean-up since the playroom half is still a mess. I will save that for another day.

A little closer photography reveals the true extent of the damage:

Left side before -

Left side after -
Right side before -
Right side after -

All-in-all, I am feeling much better about the garage. Maybe now I will have the conviction to take pictures of my HORRIBLE bedroom that I am actually in-progress on! Posted by Picasa

Thursday, September 16, 2010

Kitchen counter Launch Pad

I have a counter just to the left of my refrigerator that is used as a "launch pad". This is a term I picked up from Cynthia Townley Ewer's book House Works. (See organizedhome.com for more info from this fabulous author.) I will just have to do a separate post to tell you about this great resource. Anyway, I have a counter that has all the "stuff" I use a lot in the kitchen/living room - pencils, paper, kids clutter, etc. And it has turned into just that, clutter. So, this was my next project. Cynthia suggests a method called STOP for tackling small areas. I used it here, you will have to get the book or go to the website if you want all the details. I used it to clean all the stuff that didn't go here or have a distinct home here, and this is what I was left with.
Neat, but not functional. I still had all this - that need to be usably stored in the area. A bunch of empty baskets on a counter that looks neat doesn't really count as organization. So, I started on the hunt for some kind of small boxes to divide the available space in the baskets I currently have. Wow! Talk about expensive! I wanted small boxes to hold things like paperclips, stamps, magnets, and then some larger ones to hold scissors, paper punches, and tape. There is nothing I could find locally or on the Internet that would give me the quantity I wanted for a price that I was even willing to consider paying. $0.89 per box was the cheapest I could find! And, there was no way to get close the sizes I was really looking for.
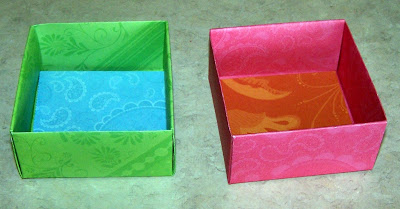
I found myself in the depths of despair. Were my efforts at organization really going to be thwarted so easily and early? NO! Inspiration hit! I had an epiphany! I remembered folding some paper boxes at a friend's stamping party a year or two ago, so I started the hunt again. A quick search for "origami boxes" returned this site - Easy Origami Instructions! I zipped down to Walmart for some cute card stock paper, and the result was -

The fabulous thing about these babies is three fold: 1 - you can make them whatever size you want, so you can fill whatever space you have to capacity. 2 - you get to include your own style in your organization, use whatever kind of paper you want for your own look. This is one of my favorite parts, because I get bogged down without some artistic outlet. These boxes helped the organization be fun. 3 - CHEAP! I bought 30 pieces of card stock for $5 because I was so excited to get started. However, this weekend I am going to JoAnn's where they have their scrapbook pads on sale and will purchase a 100-piece pad of paer for $10. That comes out to $0.10 per box, much better than anything else you can find out there.

So, once all my boxes were assembled, my empty, useless baskets turned into this -

Now, I have a truly functional, cute area that works the way it should.

I can't wait to get to JoAnn's this weekend. Just wait until you see the top of my refrigerator when I am done!

Saturday, September 11, 2010

Pantry

First, I just have to say - Whenever you see the before pictures, just pretend they are someone else's house. I mean, not someone other than your house, someone's other than my house.

Okay, having said that, I have a pocket-sized under-the-stairs pantry. It had shelves installed on the right side which were nice, but difficult to access since they were on the right. John fixed that by moving them to the left wall. However, things regularly got to a state of disrepair.

Left-side before -
Left-side after -Alright, I know this room doesn't look too much different, but that is just because the angle is hard to photograph. In the second picture, there is MUCH more organization at work, you will just have to trust me. Top shelf has bins with instant foods, mixes, and pasta. Second shelf has snack items - boxes where possible and bins for loose stuff. Third shelf has cold cereals, muffin mixes, hot cereals, and other breakfast items. Bottom shelf has popcorn and paper goods. On the floor are #10 cans of fruit and other items to heavy for shelves.

Right-side before -
Right-side after -
There is just no space to put large quantities of flour, sugar, etc - so the buckets have to suffice.

Before -
After -
This is one of my own favorite original ideas. I just don't have a good place in my kitchen for spices, let alone for spices that are not in constant use. So, over the back of my pantry door, I put up a clear shoe-bag. In the top are mixes, and in the bottom are the excess spices. This was a pretty good idea to start with, but to make it better, I alphabetized so I can actually find what I want when I want it.

Yeah! I actually feel like baking again!
Posted by Picasa

Thursday, September 9, 2010

Start Simple

Really simple. Like, kitchen drawers. A few at a time.

And maybe a linen closet for luck!


Posted by Picasa